Construction method of dry-hanging terracotta panel curtain wall (4)
5. Construction process flow and operation key points
5.1 Construction Process Flow
The construction process flow of this method is shown in Figure 5.1.
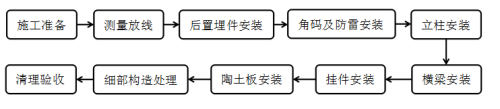
Figure 5.1 Construction Process Flowchart of Dry-Hung Terracotta Panel Curtain Wall
5.2 Key Operational Points
5.2.1 Construction Preparation
1. Layout and Division of Panels
(1) Use a theodolite and level to mark control points and lines on the exterior wall surface, then measure the actual positions and dimensions of building elements such as door and window openings, lines, walls, and overhanging eaves starting from these control points and lines.
(2) Use CAD software to draw the actual elevation of the building based on measurement data, optimize the layout and segmentation drawing in combination with the design scheme from the design institute, ensuring aesthetics, safety, material savings, and facilitating construction and production;
(3) During layout segmentation, priority should be given to controlling the height of panels with floor height and the width of panels with openings for doors and windows as well as corners;
(4) Mark each panel of different sizes on the drawing with a letter code, and panels of the same size should use the same letter code.
(5) Based on the layout segmentation drawing, count the number of panels of the same specification, and present the letter codes, dimensions, quantity, and area of the panels in a table format to form a cutting list.
2. Prepare the material delivery plan, labor requirement plan, and construction schedule, and submit them to the supervisor for approval.
3. Organize technical personnel to familiarize themselves with drawings and construction plans, promptly identify and resolve any issues that arise, and properly handle the handover procedures between different trades.
4. Based on the site conditions, construct and determine temporary production and living facilities on site, identify water supply, power supply, and transportation methods, and ensure the storage and preservation of materials and equipment after their arrival.
5. Organize workers to enter the site, conduct three-level safety education, technical briefing, safety briefing, and familiarize them with the on-site construction environment.
6. According to the construction conditions, erect or reinforce the required scaffolding, install vertical transportation facilities, and produce necessary construction items such as joint sealing strips.
5.2.2 Base Layer Inspection and Treatment
1. Base layer inspection: The cement mortar leveling layer of the wall shall comply with the acceptance standards for general plastering works specified in GB50210-2001 "Code for Quality Acceptance of Building Decoration and Renovation Engineering." Additionally, the base layer of external wall insulation mortar shall meet the acceptance standards for wall energy efficiency works specified in GB50411-2007 "Code for Quality Acceptance of Building Energy Efficiency Construction Engineering."
2. Base treatment
(1) Inspection and treatment of base layer flatness: If the flatness of the wall base layer and the squareness of door and window openings do not meet the requirements of general plastering, a 1:2 cement mortar or polymer-modified cement mortar should be used for leveling treatment, with the thickness of the leveling layer preferably greater than or equal to 10mm;
(2) Inspection and treatment of base defects: If there are hollows, cracks, or shelling phenomena in the base, use a grinding wheel cutter to cut through, thoroughly chisel and clean until reaching the original base layer. After moistening with water, level it with a 1:2 cement mortar in layers.
5.2.3 Measurement and Layout
The construction measurement of the curtain wall should be coordinated with the axis measurement of the main structure. Horizontal control lines and vertical control lines are first marked on the wall surface. Then, based on the construction drawings and layout partition drawings of the terracotta panel curtain wall, the vertical positioning lines of the vertical keels and the horizontal installation control lines for each row of post-installed embedded parts are laid out.
According to the site conditions after layout, the actual constructed civil structure is measured and verified. If significant discrepancies are found between the layout partition drawings and the actual site conditions, adjustments should be made before proceeding to the next construction phase.
5.2.4 Installation of Post-installed Embedded Parts
1. Positioning of Post-installed Embedded Parts
Make a cardboard embedment piece with the same shape and specifications as the rear embedment. Draw a vertical centerline on the cardboard embedment piece. Align the cardboard embedment piece against the wall, ensuring its centerline matches the vertical positioning line of the stud. Align the top edge of the cardboard with the horizontal installation control line for each row of rear embedments. Use a marker to mark the four installation holes.
2. Installation of Chemical Anchors
At the marked locations, drill holes using an impact drill, with the diameter and depth determined according to the design drawings; use a specialized air pump or air compressor to clean out the dust from the holes, repeating the process no fewer than 3 times, ensuring no dust or visible water remains inside the holes; insert the glass tube anchor with the rounded end inward into the hole and push it to the bottom, then use an electric drill with a specialized installation fixture to forcefully rotate the bolt into the hole, avoiding any impact method; immediately stop rotating once the bolt reaches the bottom of the hole or the marked position on the bolt, remove the installation fixture, and avoid any disturbance from the gel stage until full curing is complete.
3. Pull-out Test
The embedment depth and tightening degree of chemical anchors directly affect the safety of the entire curtain wall. Therefore, anchor pull-out tests must be conducted to verify whether the design strength requirements are met. A sampling of 0.1% of the total inspection batch, with no fewer than 5 anchors, is required. Only after passing the inspection can the embedded parts be installed.
4. Installation of Embedded Parts
Place the embedded parts over the four anchor bolts, initially tighten the nuts, adjust the surface flatness and verticality of the anchor plate, then fully tighten the nuts. After installation, a torque wrench must be used to verify the tightening force of the bolts and nuts, which should be no less than 60 N·m. The sampling rate should be at least 1/3, and spot welding should be applied to ensure safety and reliability.
5.2.5 Installation of Corner Codes and Lightning Protection
1. Installation of Corner Brackets
Based on the vertical control lines, mark the installation positions for the corner brackets. During welding, align the corner brackets with the ink lines, temporarily spot-weld the brackets on both sides at the same horizontal level, and then inspect them. Next, spot-weld the middle corner brackets of the same column, check and adjust the vertical alignment of all corner brackets for that column. Once everything meets the requirements, proceed with full welding of the corner brackets to the embedded parts.
2. Lightning Protection Installation
According to the design drawing requirements or using φ12 lightning protection connection steel bars welded to the post-installed embedded parts, and connect them to the lightning protection system of the main structure. The horizontal spacing of lightning protection connection steel bars should not exceed 10m.
3. After the installation of post-installed embedded parts and angle code adapters is completed and passes inspection and acceptance, perform anti-corrosion and rust-proof treatment on the welded positions.
5.2.6 Column Installation
1. The columns are made of galvanized square tubing. After the columns are cut to size, the bolt holes are positioned according to the angle bracket adapter, with a positioning deviation of less than 2mm. Then, a bench drill is used to drill the bolt installation holes.
2. First, install the upright columns at both ends of the wall. Once the columns are in place, connect them to the corner bracket adapters using stainless steel bolts. Adjust and secure the position of the columns according to the plumb line and the wall edge line to ensure the correct distance from the wall and vertical alignment.
3. The columns are installed layer by layer from bottom to top. At the joints, a 5mm thick galvanized steel plate with L≥300mm is used as an expansion joint. The upper end of the steel plate is fixed to the upper column with bolts, while the lower end is inserted into the already installed lower column, leaving a 20mm expansion gap at the joint between the upper and lower columns.
4. After the installation of the columns at both ends is completed, two thin steel wires are stretched between them to adjust the overall flatness of the middle columns during installation.
5.2.7 Beam Installation
1. After the columns are installed, based on the horizontal installation control line and the design width of the terracotta panels as well as the horizontal joint width, the installation positioning lines for each row of beams are marked on the columns in sequence. Each positioning line must form a closed loop around the building perimeter and be verified as correct before welding the beams.
2. The crossbeam is generally made of galvanized angle steel short crossbeams, with the length determined according to design requirements (usually not less than 250mm). After the angle steel is cut, use a bench drill to make installation holes for the hanging bolt.
3. Align the crossbeam with the installation positioning line, temporarily fix it by spot welding, verify the accuracy of the crossbeam position, and use a level to check and adjust the flatness. After passing the inspection, perform full welding to fix it. The installation quality of the crossbeam will directly affect the straightness of the horizontal joints of the terracotta panel installation, making it a critical construction process that requires enhanced quality control.
4. Clean the welding slag at the weld, then apply rust-proof paint and protective topcoat to the damaged areas of the weld and the anti-corrosion layer.
5. After all the beams are installed, a concealed acceptance inspection of the framework must be conducted jointly with the supervisor and construction unit. Once the inspection is approved, proceed with the installation of hangers and ceramic panels.
5.2.8 Pendant Installation
1. The hanging piece is fixed to the crossbeam with bolts. One end of the hanging piece features an adjustable mounting hole, while the other end has both upward and downward notches, with the upper notch being half as deep as the lower one.
2. Secure the bracket to the beam by passing bolts through the mounting holes of the bracket and the insulating washers. Do not fully tighten the bolts initially; wait until the terracotta panel's flatness is checked and adjusted before tightening them.
3. According to the design drawings' requirements for the terracotta panel's installation distance from the wall and the wall end line, first tighten the brackets on both sides of the bottom row. Then, stretch a leveling control line between the two brackets, and based on this control line, sequentially tighten the bolts of the other brackets in the bottom row.
5.2.9 Terracotta Panel Installation
1. Establish control lines for joint straightness and surface levelness.
(1) Set up primary installation control lines: At each of the four corners of the wall surface to be installed, weld steel bars to the beams. Stretch thin steel wires between each pair of steel bars, then adjust their verticality, levelness, and distance from the wall according to the wall's vertical lines, horizontal lines, and the spacing of the terracotta panels from the wall.
(2) Establish vertical joint straightness control lines: Based on the vertical lines of the primary installation control lines and the layout partition diagram, draw the first column's vertical joint straightness control line for the terracotta panels. Install vertical joint straightness control lines every 4-6 columns.
(3) Establish horizontal joint straightness control lines: From the horizontal lines of the primary installation control lines, draw the first row's horizontal joint control line and levelness control line for the terracotta panels. The horizontal joint control lines and levelness control lines should be moved upward with the installation of each row of terracotta panels.
2. Installation of Terracotta Panels
(1) For ease of operation, terracotta panels should be installed row by row from the bottom upwards. For each row, start by installing the corner panels first, followed by the intermediate ones.
(2) First, apply weather-resistant sealant into the upper groove of the already secured first-row corner bracket using a sealant gun. The thickness of the sealant should ideally be half the depth of the groove. During construction, take care to prevent the sealant from contaminating the panel surface.
(3) Each clay plate requires at least four hangers. Insert the load-bearing wall of the first clay plate into the hanger slot, fasten the upper row of hangers, roughly adjust the position of the clay plate, and then initially tighten the bolts.
(4) Adjust the upper row of two hangers along the direction perpendicular to the wall according to the flatness control line. Tighten the bolts of the upper hangers once the panel flatness meets requirements; move the panel left or right to align its edge with the control line based on the vertical joint straightness control line.
(5) Attach the joint sealing strip, which has the same width as the vertical joint, tightly against the inner edge of the terracotta panel using self-tapping screws on the beam. The strip should extend into the panel joint by at least one-third of the panel thickness. Ensure the strip is straight and continuously installed to guarantee waterproofing effectiveness.
(6) Install the remaining terracotta panels sequentially following the above steps. Adjust the vertical joints of the currently installed panel by moving it left or right until it just fits the joint sealing rubber strip, avoiding excessive force that could displace adjacent panels. Use the centrally placed vertical joint straightness control line for correction to minimize error accumulation. Regularly check the installation flatness of the panel surface with a 2m straightedge during the process.
5.2.10 Detail Construction Treatment
1. Inside and Outside Corner Construction
For the inside and outside corners of terracotta panel curtain walls, besides using prefabricated special-shaped terracotta panels, on-site splicing methods can also be employed.
(1) Outside Corner: The back edges of the two adjoining terracotta panels are cut at a 45° bevel using a cutting machine. First, install and fix one side of the terracotta panel, applying weather-resistant sealant evenly at the joint. Then, install the other side of the terracotta panel, adjusting its position to ensure a uniform 3mm gap at the joint. The joint should be even, and the outside corner must be square.
Detail Drawing of External Corner Construction
(2) Inside corners: During assembly, evenly apply weather-resistant sealant to one edge of the terracotta panel, then directly overlap it over the adjacent installed panel surface. The two panels should not make direct contact—maintain a gap consistent with the width of nearby panel joints. Ensure the joint is uniform and the inside corner forms a neat right angle.
2. Partial Mid-Panel Compensation Installation
First, thread a cotton rope through the middle cavity at both the top and bottom of the terracotta panel to be installed, tying both ends tightly on the panel surface. Lift the panel by pulling the upper and lower ropes, tilt it to insert into the slot of the upper row of hangers, then flatten the panel and slowly release it to secure it into the slot of the lower row of hangers. Adjust the vertical joints by moving the panel left or right. After installation, untie the cotton ropes and gently pull them out.
3. Door and Window Opening Edge Construction
For door and window opening edges, use 3mm-thick aluminum single panels fixed with self-tapping screws or plastic expansion bolts. The panel color is determined by the design, and all joint gaps should be sealed with weather-resistant sealant.
During the installation of aluminum single panels for window openings, follow the sequence of top to bottom, then left to right. The window sill and door lintel aluminum panels should have a 5% outward-sloping drip edge (higher inside, lower outside), with drip holes drilled below the aluminum panels. The lower edge should have a 5% outward-sloping drainage slope (higher inside, lower outside). The interface between the aluminum panels around the openings and the door/window frames should be sealed with thermal insulation strips and weather-resistant sealant.
4. Parapet top structure
If the last row of terracotta panels at the parapet top is not a full piece, it can be specially customized with the manufacturer or cut on-site from a full panel before installation. When cutting, first mark the panel and then cut along the line to ensure a straight and clean edge.
The parapet wall top is finished with 3mm thick aluminum single plate, fixed with self-tapping screws or plastic expansion bolts. The aluminum plate surface should have a 5% inward drainage slope (i.e., lower inside and higher outside), and the gaps between joints should be sealed with weather-resistant adhesive.
5. Exterior Wall Plinth Construction
The terracotta panel curtain wall plinth should have an expansion joint to avoid direct contact with the ground and ensure rainwater does not penetrate the curtain wall cavity. The bottom row of terracotta panels should be 15mm away from the outdoor ground, with the gap filled with foam rods and sealed with weather-resistant adhesive no less than 3.5mm thick on the surface.
6. Expansion Joint Construction
At the wall expansion joint, pre-install the finished expansion joint panel and ensure proper insulation and waterproofing. Install one column and beam on each side of the expansion joint, with the terracotta panel joints positioned between the two columns. This prevents uneven building settlement deformation, which could cause the terracotta panels to crack.
5.2.11 Cleaning and Inspection
After terracotta panel installation, conduct a systematic inspection of the completed surface to check for any stained or soiled panels. For contaminated areas, first wipe them clean with a cotton cloth dipped in a small amount of cleaner, then wipe again with a damp cloth. Throughout the installation process and after completion, take care to protect the finished product, strictly avoiding stepping on it or allowing heavy objects to impact it.
(Source:Shaohua Ceramic Panel Manufacturer)
Jiangxi Shaohua Ceramics Co., Ltd. adheres to the principles of environmental protection, ecology, and humanity. The company specializes in the development, research, and innovation of clay-based architectural products, with main products including terra-cotta curtain walls, ceramic bricks, terra-cotta rods, terra-cotta louvers, and other new exterior wall decorative building materials.
 HOME
 PRODUCT
 CASE
 CONTACT